Language

Diagramming & Dry Erase

As my son (age 13) starts Latin this year (with The Lukeion Project), I am out of the grammar business with him, and starting anew with my two youngest.  I’ll post about our grammar progression at a later date, but I really enjoyed these “art” projects they created today. The assignment was to take the sentence, “The bird eats the worm,” and add modifiers.

The red bird gorily eats the poisonous worm. (boy, age 10)

The rainbow bird majestically eats the sparkly worm. (girl, age 12)

Dictation & Dry Erase

Early Elementary Dictation

What does early dictation look like? Here is a current snapshot of dictation with my two youngest students.

We practice dictation 3 days a week, usually M/W/F. I work with each child to choose a sentence from a book they are reading.  They have a moment to study it, then we dictate.  The kids love using dry erase for this. I don’t know why, but it works!

Step 1:  Dictate the sentence.  After they complete their best work, I give them the book to proofread the sentence.  We talk about errors.  In the picture below (8 year old boy), we discussed the use of capital letters.

IMG_7515

Step 2: Quick grammar lesson.  We start with “circle the nouns” and move through the parts of speech slowly, over a year or two, depending on aptitude.  The picture below is my 10 year old daughter.  She can identify all 8 parts of speech, with the exception of some tricky adverbs.  However, her handwriting skills have been slow to develop, so she is still doing very short sentences.

I keep Grammar Concept checklists for each child to remind me which concepts they might need to learn next.  I will often guide them to a sentence that suits the checklist.

IMG_7729

If you don’t like the idea of choosing sentences from a book, I have some links to sentences on my main Dictation page.

Doodle Animals

In Classical Conversations we spend the first six weeks of the year learning the “OiLS” method of drawing taught in Mona Brookes’ book “Drawing With Children.”  OiLS stands for circles (O), dots (dot of the i), straight lines (line of the i), angled lines (L), and curved lines (S).  The children learn to see these elements in many different pieces of art and drawing.

These same elements are also used in the meditative drawing technique of Zentangles.  We do doodles/tangles in our house almost every day as a way to focus our minds and exercise fine motor muscles (sample day here).

doodle horse

The Idea

Combine OiLS drawing method with other drawing techniques, including Zentangles.


doodle frog

The Execution

Lately we’ve been combining our doodles with regular drawing exercises (from 20 Ways to Draw… books).  For younger children (or those with less drawing experience), you could print a picture off the internet and have them fill in the spaces with doodles.  The pictures on this page took a week or two to complete, working 5-10 minutes each day.

doodle squirrel

The Extension

For older children (or those more advanced in drawing), use doodles as accents and/or shading for 3-dimensional drawings.  Results would be similar to the techniques of hatching, cross-hatching, and stippling.

Writing with Legos

Fridays are “Project Day” in our house: the day to get to all the fun things that we can never make time for during the week!   We rotate through language arts, math, science, and art projects.  The past few weeks we returned to an old favorite, the Grammar Garden.

The Idea

Use a favorite toy to elicit creative writing.

The Execution

The kids spent a few minutes building their gardens using the Lego characters, special pieces, and a few building pieces.  Then we went through and named all the nouns in their garden.  At that point they were losing interest, so we put the gardens on a shelf for the next week.

The next Project Day we added verbs and adjectives, and talked about how the different pieces of the garden might fit together into a story.

GG-2 GG-1

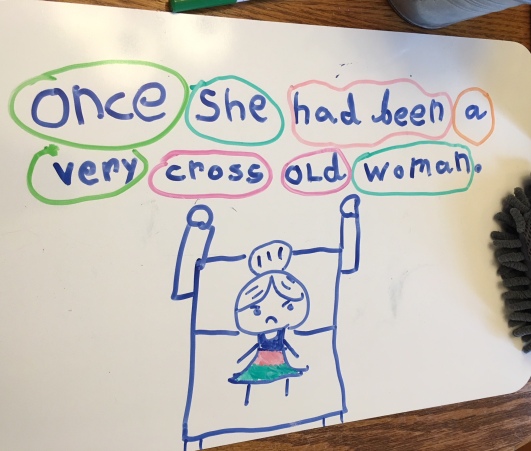
Finally, in the third week we wrote our stories.  A highly motivated child might be able to do this all in one day, but I find that 15 minutes is about our limit, especially with a 6-year old participating!  The kids dictated their stories to me, and I typed them into the computer.

Age 7:

“The brave knight rides the pretty white horse to the dragon’s hill. He climbs the mountain. A red dragon breathes hot fire at the knight. The knight beat the dragon. He climbed the rest of the hill and saw a mean, ugly, and smart alien. The alien was throwing his light-sabers at droids. Then the alien threw Thor’s hammer at a man dressed as a clown.”

Age 9:

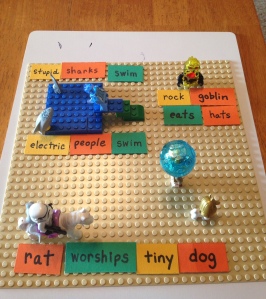
“Once upon a time, a rock goblin ate an electric man’s hat. The man was scared of the goblin, so he ran and jumped into the ocean.   Then he saw two sharks, right before he jumped off the ocean diving board. He realized the stupid sharks were artificial. When the electric man got out of the ocean, he saw a Stormtrooper riding a horse with a pet rat.   The Stormtrooper saw Mace Windu carrying a rare crystal on his head, so he stole the crystal and went to worship the tiny dog.”

The Extension

Any favorite toy works for this project.  When my teenager was 7 or 8, her favorite toy was Polly Pockets.  She would build elaborate scenes with them, and then act out a story.  I would write down her story into a “book” (printing paper folded and stapled – super fancy!).  She loved to draw, so she would illustrate her stories.  Those books are some of our favorite mementos from her childhood!


Learning Fractions Through Art

One of my areas of frustration with early math learning is fractions.  There’s only so many times we can break a candy bar into pieces, or cut a pan of brownies, or slice a pizza.  Why are all the fraction activities based around food?

The Idea

Explore fractions through art projects.

The Execution

Last week we completed two art projects where we incorporated fractions as a natural part of what we were creating.  The first project was based on Ed Emberley’s Picture Pie book.  I used a large 1-inch circle punch and punched a pile of circles in different colors.  The kids helped me cut some of the circles into halves, quarters, and eighths.  First, we made some of the animals in Picture Pie.  I made sure to use “fraction speak” when asking my kids for pieces: “can you hand me three eighths in orange for the bird’s wings and beak?”

Fractions 1

Bird from “Picture Pie.” Age 5

A few days later my daughter asked to do some more Picture Pie.  We looked at some of the fancy mosaic pictures, and she decided to create her own “Christmas Picture.”  Note that after she glued her mosaic, she embellished her picture with some fraction-esque drawings.

Fractions 2

Age 7

Later in the week we incorporated more of fourths and eighths into our daily Doodles.  I taught the kids a new pattern we called “Flying Saucers.”

Fractions 3

Flying Saucers is in the bottom right quadrant.

We practiced Flying Saucers on scrap paper before starting our Doodles.  Even my 5 year was able to “draw an oval, then draw one line down, draw one line across, and draw four lines from the center out,” breaking the oval into eighths.  Before I even mentioned it, the kids had a collective light bulb moment where they shouted out that we were drawing eighths!  None of them chose to use the new pattern in their daily Doodles, but I later discovered this picture that had been created during free time:

Fractions 4


The Extension

We will be returning to these projects later in the year to learn twelfths.  We will also add in fractions from squares and rectangles.

I would like to create some mixed media pieces (cut and paste, markers, pencils, etc) using the ideas we learn from Picture Pie and our Doodles.  Kandinsky is a good inspiration for these pieces.

Composition 8 by Kandinsky


20 Ways to Draw…

The Idea

Find a drawing book to bridge the middle years (ages 9-11).

The Execution

My littlest kids (ages 5-7) have always enjoyed Ed Emberley’s drawing books.  But one by one they would grow out of these books, or simply be ready for something a little more challenging, a little more realistic.  I spent years trying to find a good drawing book for ages 9-11, or even a book with simple drawings that weren’t childish.  One day I was browsing the book section at Cass Art in London when I found it!  A whole series entitled “20 Ways to Draw….”  So far we own 20 Ways to Draw a Tree (nature subjects) and 20 Ways to Draw a Cat (animals).

Art 75 Art 77

The Extension

The realistic nature of these drawings makes them a good reference for nature journaling.  Use these drawing techniques and ideas to learn more about leaf and tree shapes, bark texture, snowflake crystals, etc.

Art 47


Map Tracing

This year I’ve started taking my younger kids to a Classical Conversations group once a week.  I wasn’t sure how they would like it, but we needed a way to meet new friends in a new city.  So far they love it.  In the younger years it’s just memory work set to songs and games.  It’s right up their alley.  One of their favorite subjects is geography.  Each week they spend a few minutes tracing a map of the US in pencil.  It’s always very rushed, so they asked to try it at home, relaxed and with their favorite drawing tools.


The Idea

Trace a map.  This exercise is meant more to familiarize the student with the map, not for specific work in recognizing the states/countries.  That element comes later after familiarity is established.  (Maps below are from 2 of my kids, ages 7 and 9).

US MAP - SUS MAP - E

The Execution

Supplies

  • Map
  • Tracing Paper
  • Tape
  • Fine Tipped Markers (we like these Sharpie ones, but any fine-tipped art marker will work)
  • Optional: a flat board, like a cutting board, to make the project moveable.

Tape the tracing paper to the map and trace.  At first, only trace one or two states/countries, especially if the student is still developing fine motor strength.  (My daughter who struggles with handwriting sometimes prefers this exercise to handwriting practice.  I’m completely fine with that, as she will spend longer, and get more muscle practice, with the map.)  Over time, add more pieces as the shapes become more familiar.  If the child has interest, trace the same map multiple times over a few weeks, or even longer.  If you meet any resistance or frustration, put the map away and pull it out later.  Do only one state a week if that pace works!

The Extension

Draw maps of different countries and regions.

Label maps.

Draw maps on clear plastic, such as sheet protectors.  Stack to create layered maps.


Punch Art Fall Trees

I could write a blurb about how great glueing down tiny pieces of paper is for fine motor skills.  But the truth is that this art project was born out of desperation and wanting my kids to just sit still so I could unpack the house after a move!

The Idea

Pull out those craft punches you used for scrapbooking (you know, before your kids were talking) and create a scene for kids to make.  I had leaves, stars, and flowers, so we made a night sky with fall trees.

The Execution

Supplies

colored paper
craft punches
glue

I punched out the shapes for my kids, as the punches can be quite stubborn.  We used torn brown paper for the trees.

Art 31

Age 4. Gave up and took a nap.

Art 32

Age 5. The conscientious artist.

Art 33,jpeg

Age 7. The kid that has to be different. And also line things up.

The Extension

In spite of its dubious beginnings, we actually really liked this craft.  We used up some leftover bits to make solar system / night sky pictures another day.

Art 6 copy

Art 7 copy

Art 8 copy


Subject-Object Switcheroo

The Idea

A silly activity to learn more about nouns.

The Execution

Once my kids start to understand nouns and verbs, I introduce them to the concept of subjects and direct objects.  “Some nouns DO the verb; some nouns have the verb done TO them!”  And wouldn’t it be silly if they were switched…

Print out a picture from the links below and allow children to color them if desired.  Create small cards for each word in the sentence. (If you’ve done Grammar Gardening, try to be consistent in the colors you are using for nouns, verbs, etc.)  Have your child try to create the sentence that describes each picture.  Next, ask them to find the verb and the nouns.  Show them what happens when you switch the two nouns; explain the difference between subjects and direct objects.

For an older child who enjoys drawing, ask them to draw the picture; then ask them to draw the picture when the nouns are switched.

Subject:  Who? or What? + verb 

Direct Object:  verb + What? or Whom?

The elephant plays the cello.

The bear rides the bicycle.

The bird drinks the nectar.

The rabbit picks a flower.

The cat plays the fiddle.

The crocodile holds the balloons.

The mermaid rides the dolphin.

The duck wears a hat.

The lion eyes the cheetahs.

The squirrel eats a nut.

The Extension

If your child is doing copywork at this age, ask him if he can find a direct object in his next copywork.  What would his new copywork be if the subject and direct object were switched?